- by Ken "Chaobo" Serra
- Posted on October 29, 2013 @ 4:00 PST


Last time, we covered the very bursty and stationary-driven damager-dealing class, the Black Mage. Now, let's look into the highly-mobile dps'er, the Bard. Yes, I put "DPS" and "Bard" in one sentence because in Final Fantasy XIV: A Realm Reborn, these in-combat ministrels deal a ton of damage while providing much-needed support through song. If you're looking to dish out pain while supporting your party with mana regen and damage reduction, well this is pretty much it right here. This guide should be relevent up to this moment in time. Enjoy!
How to become a Bard
In order to become a Bard, you need to attain Level 30 Archer and Level 15 Pugilist. Prior to A Realm Reborn's release, Bards used to require level 15 Conjurer... Well that's not the case anymore because this particular job leans more towards damage-dealing than support. I guess Square Enix did that for the sake of Duty Finder... Alas, I still long for a pure support, none-healing job but you know, this is as close as I'm going to get.
The Archer's guild can be found in Gridania and once you have the nessecary pre-requirements full-filled, you'll want to teleport to Quarrymill and go just a touch West. There, you will meet Jehantel. Also note, this is where you will go to complete your bard storyline from now on.
General damage compared to others
You do a ton... A lot of damage... from a safe distance. You can also use all of your abilities while moving which means your DPS is sustained and constant. Even though your damage is fast and done in decievingly small numbers, you scale really hard from Critical Hits and generally come packed with a lot of it. At the moment, you're the perfect DPS because you can avoid fight mechanics and still do damage. The only time your doing less damage is when you have a song active, which reduces your damage by 20% while active. Even though you'll be called to do that every now and then in a fight, you'll still be on the charts doing a lot of overall damage.
As far as fight mechanics go, your damage draws from four skills on the 2.5 second GDC and your ability to use the many off-GDC skills you have around them. GDC > Off-GDC > GDC > off-GDC. Basically, you need to have fast fingers during your initial rotational combo as well as good judgement about which off-GDC skills you use.
AS OF NOVEMBER: Bards are getting re-worked in patch 2.1. Whether or not it's a nerf or not is something that shouldn't be dicussed at this time but I think Square Enix is looking to make some changes. After all, there's still room for Musketeer and the "gun" class to be the real physical-based ranged DPS.
All the Skills to Note
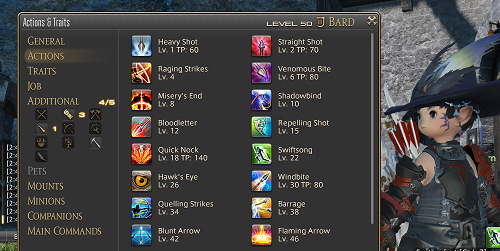
*** Quelling Strikes (34) - Alright, you don't get this till level 34 but I'm going to put this first on your list. Please keep this somewhere easy to access. Basically, it makes all your attacks during the duration draw less agro. Abuse this skill till the key it's on no longer functions. Thanks!
ON-GLOBAL COOLDOWN ABILTIES
Heavy Shot (1) - Pretty much your basic attack. This is the skill you will be using a lot... Forever. It's a 150 potency skill that gives a 20% chance for your next Straight Shot to guaruntee crit.
Straight Shot (2) - This skill is a little weaker than Heavy Shot being only 140 potency but it grants you a buff that increases your critical hit rate by 10%. This buff has to be kept on permanently, either through use of Heavy Shot's proc or on your own accord. Basically, use this skill every 18 seconds so you can keep the buff up for as long as possible.
Venomous Bite (6) - A single-target Damage over time skill that you must learn to keep up. It has an initial potency of 100 and ticks for 35 potency every 3 seconds. What's important about this spell spawns at Level 48 when you get a passice called River of Blood. More details later.
Windbite (30) - Your second single-target damage-over-time skill that you must learn to keep up at all times. It's a little weak initially being 60 potency but ticks for 45 potency every 3 seconds. With venomous bite, you're doing an additional 80 potency worth of damage around your skills. This spell also procs River of Blood at level 48.
OFF-GLOBAL COOLDOWN ABILITIES
Bloodletter - The first skill you get that will be off the Global Cooldown. It's a 150 potency attack that has a 15 second cooldown and no TP cost. You can use this in-between any of the above mentioned skills to keep your damage more sustained. While this is one of them, proper use off these off-GDC skills is what will make or break your damage capabilities, from a min/max perspective of course.
Misery's End - The strongest single target damage skill in your kit. At 190 potency you'll hit fairy hard and it's also on a 12 second CD. The catch? It can only be used when target is under 20% (which means your target is under 20% when it pops, heh). Basically, once your target reaches that point your damage amps up because that's just more off-GDC skills at your disposal.
***River of Blood (48) - One of your most important passive skills. Basically, every time one of your DoT spells crit (per tick not on-cast) you have a 50% chance to completely reset Bloodletter. Basically, if the RNG gods have decided it be so, you will pump a TON of damage spamming bloodletter in-between your skills. Of course, don't forget to watch your hate!
Raging Strikes (4) - The typical "buff your damage roflcopter big numbers" skill. This buffs your damage by a flat 20% every 120 seconds thanks to the passive Enhanced Raging Strikes (28). You'll definitely want to fit this somewhere in your rotation but becareful, hate will be a potential issue. If it isn't, this'll make your super small numbers turn into super fast medium numbers, rawr.
***Quelling Strikes (34) - Just making sure you know about this skill. Abuse this skill till the key it's on no longer functions. Thanks!
Internal release - This buffs your crit rate by 20% every 60 seconds. Basically, if you want to see big numbers more often use this spell as soon as it's up.
Hawk's Eye (26) - A spell I feel Black Mage shouldn't have access to but they do anyways... But I digress. Anyways, this will give a flat 15% DEX increase as well as a 20% buff to physical accuracy every 90 seconds. Assuming you've somewhat itemized your character to where you're supposed to be, accuracy isn't a big issue. Though, 15% DEX at level 50 translates to a 60(+/-) stat increase and is thus equivilant to a weapon that has 10(+/-) weapon damage more than the one you're currently using. Basically, even more bigger numbers.
Barrage (38) - Probablly one of the most under-used or incorrectly used skills in your kit. Basically, it makes it so your auto-attacks do 3 strikes instead of one eveyr 90 seconds for 10 seconds. What some people don't know is auto-attacks still go off in-between skills so this skill makes for a mega-ton of burst damage. Use it between your GDC skills somewhere but please... use it after quelling strikes. Thanks!
Flaming Arrow - An AoE damage over time skill that's off the GDC. It does 35 damage potency per tick, which means with all 3 DoTs at your disposal, you're doing 110 potency worth of damage in-between your skills for near-free. Remember though, this is terrain-based so you don't want to place it somewhere where a creature will walk over it and agro your group.
Area of Effect Damage skill
Wide Volley (50) - Your standard "spam this for instant AOE" skill. It's a 110 potency skill that has a fairly wide radius. Even though AoE is great, this spell costs 160TP which means you'll burn your 1k TP bar in the blink of an eye. The one great attribute about this skill is it has a 15% chance to make your next Rain of Death cost 0 TP
Quick Knock (18) - Another AoE spell that has 110 potency. This skill has a 140 TP cost, making it cheaper but has zero procs. This is actually the succesor to Rain of Death in the AoE damage rotation because that skill has a 15% chance to make Quick Knock cost 0TP.
Utility Skills/Songs and when to use
Please note that all songs EXCEPT Foe's Requiem will reduce your damage by 20%.
Mage's Ballad (30) - Gives your party mana. As a utility DPS, please watch your healer's mana and be the one to decide when mage's ballad is appropriate for you to use. You don't want to use songs during DPS-races however, you don't want healers running out of mana. While it's their job to be as efficient as possible, you provide an amazing buffer that could potentially negate failure due to mana issues.
Foe's Requiem (35) - A buff you should permanently keep up when your partner DPS (or part majority) are casters. It doesn't reduce your DPS at all but increases there's by minimum 10% for the duration of your mana.
Army's Paeon (40) - This gives your party TP. Definitely something to think about using when your TP becomes low because that means the other DPS are likely running dry as well. Don't use this spell when you hit 0 TP. It's best to use it around the 300 range so you can stop it when you're at the 600 range and you don't lose too much DPS.
Rain of Death (45) - As a support DPS, please make the needed TP calculations to make room for this skill during damage-intensive situations. It's an AoE skill that costs 200TP (A TON) but it reduces damage done by the targets struck by 10%. That doesn't seem like a lot, but with combined party effort and other spells like Virus being put out, you could be negating 400 damage that couldn't be healed by your healer. Also has a 15% chance to make Quick Knock cost 0TP. An added bonus I suppose.
Battle Voice (50) - Ah, I remember FFXI. This skill doubles the effectiveness of whatever song you have out. You can restore your Healer's mana to full in seconds or make your casters do more damage! Generally, when you are taking the time to sing a song, you should probablly just pop this skill anyways. The 300 second CD is something to decide on usage on your own.
---------------
Blunt Arrow - Probablly one of the most useful utility skills/interrupts in the game. This skill SILENCES which prevents most enemies from casting skills. A DPS with a 30 second cooldown on his silence is excellent to have, especially since this particular class is ranged. It's also off the GDC, meaning once it's up it's up.
Repelling Shot - The old 'jump back' move. You actually jump back pretty far. Keep this skill handy but don't use it all the time. Sometimes, when BRDs pull agro, they use this skill and it further increases the distance between them and the tank. This is mainly good for avoiding close-range indicated moves when you happen to take agro and the creature happens to be casting one.
Shadowbind - Your bind spell. It has it's uses but is immediately canceled when whatever this was cast on is attacked. Good for getting away with things during missions and story.
Damage Rotation
Your damage rotation will come from how well you know the above spells. Remember to not have Bard-itis please and let your tank actually hit the intended target before unloading! Once that's been established, you can get through most of your rotation without pulling all the hate.
Remember: Straighter Shot proc as well as River of Blood take priority. The rest of the time, your on-GDC spammable skill will be Heavy Shot. This guide assumes full use of Straighter Shot/Bloodletter procs as well as Heavy Shot in-between every mentioned skill.
Fight opener:
1. Straight Shot - You open your fight with Straight Shot to give yourself the 10% crit buff right off the bat.
2. Bloodletter - Remember, Straight Shot is a GDC skill so now this is where you insert a non-GDC skill. I prefer Bloodletter just to get it up again in the next 15 seconds (assuming poor RNG).
3. Venoumous Bite - Apply DoT number 1 so that River of Blood has a chance to proc.
4. Internal release - I've found applying this here has increased my DPS. I assume with the 20% crit increase, River of Blood procs more often.
5. Windbite - Having applied Internal release and raising your crit, now you want to complete your DoT rotation to have a better shot at applying River of Blood.
6 (+/-). Quelling Strikes - This might be a good time to apply this skill since your about to prepare your amp damage abilities. Depending on your tank, sometimes, this skill can be placed later in the order but for the learning bard, get used to using it and placing it here.
Post-20% HP on Target
7. Misery's End - Plug this skill in-between all on-GDC skills once your target is at 20%. Fairly straight foward, it's like having a second, stronger Bloodletter available to use.
----------------------
Personal Rotation Decisions:
Alright, now you still have five to six off-GDC skills to go through. This is where you need to determine in what order is best for your your party. I often outgear my PUG parties so I can't unload as I'd like but proper rotation order can still help you pump damage while still being efficient. I personally prefer to avoid macros and do everything by hand just so I can pick and choose what my next inbound abilities are. Macros are totally fine and do reduce human error but sometimes, you just need to take matters into your own hands.
1. Raging Strikes >>> Hawk's Eye >>> Barrage >>> Fire Arrow
Max damage rotation; high initial damage.
2. Hawk's Eye >>> Raging Strikes >>> Barrage >>> Fire Arrow
Reduced opening fight damage -- since raging strikes is a better DPS buff than hawk's eye (assuming capped accuracy) this set will give you less initial damage. It's not much of a difference but sometimes the tank needs an extra split second to finish his agro rotation and the last thing he needs is for his target to run away.
3. Barrage >>> Quelling Strikes >>> Hawk's Eye >>> Raging Strikes >>> Fire Arrow
For those occassions where you outgear your tank by several notches of iLevel. Barrage will give you decent opening damage but shouldn't be enough to pull total hate. Then you pop quelling strikes to soften the blows on Hawk's Eye THEN Raging Strikes. This essentially gives your tank a ton of extra time to establish hate which should free you up to unload at the end of this rotation.
Why is Fire Arrow last?
At the end of your rotation is where your off-gdc skills begin to die down. Fire arrow adds more DoT damage while i'm only spamming Heavy Shot and should wear off by the time you're ready to start your next set of off-GDCs.
Why wasn't Blood for Blood included?
Because Blood for Blood is a level 34 Lancer cross-class skill and is not included as part of this basic BRD rotation guide. BfB is essentially a second Raging Strikes and should be used with absolute caution. It's also on an 80 second CD so placing it into your rotation is easier yet trickier in-terms of hate.
Also, here's a visual demonstration I whipped up to help you understand what I mean by plugging abilities in-between off-GDC:
------------------------------
Area of Effect Damage Rotation
Wide Volley [SPAM unless proc] >>> Rain of Death >>> Quick Knock
The reason for this is Wide Volley and Rain of Death both have a 15% chance effect to make the next skill in the rotation cost 0 TP. All of these are TP extensive and shouldn't be spammed in a real raid scenario, unless of course it calls for AoE damage.
Stat Allocation
For Bard, you're going to do Weapon Damage > DEX > Critical Hit Rate > Determination > Everything else. Despite weapon damage being above the stat chain, Bard is one of the few occassions where you don't actually make the +1 relic weapon your first purchase. Of course, you would be sacrificing fashion points but if you're big on min/maxing then well, that's up to you.
Dexterity - Affects your ranged attack damage as well as your parry and block rates, though the latter is not why we're here. Remember, roughly 6.5 DEX at level 50 is equal to 1 weapon damage so keep that in mind when choosing your upgrades.
Critical Hit Rate - This is where Bard's shine. Unfortunately, I don't know how much crit rate equate to 1% but I can tell you every bit helps in conjuction with two of your crit buffs: Straight Shot + Internal Release. This stat priority is why I consider not replacing Toxote's (Ampadoor Keep) legs and hands till I can acquire iLevel90 equipment.
Determination - Determination is not the highest priority by any means but it does trump Skill Spell in in its current state. However, it takes 50 or so Determination to equal 1 weapon damage so don't work to obtain this, just be happy if your gear has it.
Fashion Points or Stat points
Ultimately, you're going to have to choose between these two options unless you like bubblegum pink and jester tights than golly, more power to you! Regardless, you'll want to figure out a way to optimize your point per stat ratio and determine which piece you think you'll want/get in The Binding Coil of Bahamut and which pieces you can casually spent Mythology Tombstones on.
Here's a stat comparrison between all the items for you to look at: Bard Allagan vs Mthology Stats
Special thanks and credit to //AliceRaye
Best in Slot (Patch 2.2 & 2.3)
The following items have been chosen with crit > all in mind. The items on the list also assume accuracy cap for The Second Coil of Bahamut. Enjoy!
Weapons: High Allagan Composite Bow
Soldiery Tombstone Buy Order:
- Rosenbogen *only if you’re neat UAT.
- Auroral Tabard (the HA is in T9)
- Auroral Earring is a great piece all around.
- Auroral Ring it’s one of two i110’s!
- Auroral Sash (Only marginally better than HA)
- Auroral Boots (Only marginally better than HA)
- Auroral Wristlets is technically optional but great to have.
After the above the rest is OPTIONAL.
- Auroral Bracers = VERY SUITABLE Substitute for bis.
- Auroral Coif = same as above.
- Auroral Choker is meh. use ribbon!!!!
- Auroral Brais, not just trash, but the definition of it.
Best in slot (Patch 2.1):
The following items below are what I feel are best-in-slot items for Bard. With ths whole set, it should ensure maximum accuracy for Coil (Minimum: 482 Turn 5) while providing the most amount of Critical Hit possible. Remember, we want to avoid most pieces with the secondary stat Skill Speed as Determination and Critical Hit as well Accuracy(up to a certain point) have more overall value.
- Weapon: Artemis Bow +1 (900 Mythology)
- Head: Bard's Chapeua (495 Mythology) OR Allagan Visor of Aiming (Turn 2)
- Body: Bard's Shirt (825 Mythology)
- Hands: Bard's Ringbands (495 Mythology)
- Waist: Allagan Belt of Aiming (Turn 1)
- Legs: Bard's Tights (825 Mythology)
- Feet: Allagan Sollerets of Aiming (Turn 4)
- Neck: Hero's Earring of Aiming (375 Mythology)
- Ear: Hero's Earring of Aiming (375 Mythology)
- Wrists: Hero's Bracelet of AIming (375 Mythology)
- Ring1: Hero's Ring of Aiming (375 Mythology)
- Ring2: Allagan Ring of Aiming (???)
Useful Cross Class Abilities
Feint (Lancer lv.2) - I feel as a support utility DPS, having a skill that grants a flat 20% slow to your target is absolutely nessecary. This will help keep your tanks alive in times of need. This is Final Fantasy, every skill at your disposal can't be ignored.
Invigorate (Lancer lv.22) - This skill gives you free 200 TP every 120 seconds. If you're a career BRD and you don't have this, shame! Not really needed till endgame but definitely something you have to plan. A skill that gives you free TP means less Army's Paeon and less Army's Paeon means less 20% damage reduction.
Blood for Blood (Lancer lv.34) - Arguably the best cross-class skill you can get that doesn't come built-in. If you are going to be a career BRD, you have to level Lancer to 34 to get this because it's basically a second Raging Strikes for you to use. It increases your damage by a flat 20% but increases damage taken by 25%. Basically, your trading defense for offense which isn't a huge issue on a ranged DPS. Also, this is on an 80 second CD so if you do some calculations, that equates to more off-GDC skills up for you to use over the course of your battles.
Second Wind (Puglist Lv.8) - A free 400 potency cure on yourself every 120 seconds. Even though it's not "needed", DPS do no damage when they're dead so say that again when you stay alive and out dps everyone.
Internal Release (Pugilist Lv.12) - An absolute nessecity and comes pre-packaged with the BRD job since you needed PUG 15 anyways. We talked about this before -- 20% crit chance every 60 seconds. That's as delicious as it gets.
- Gameplay Guides
- MMORPG
- Square Enix
 Final Fantasy XIV: A Realm Reborn
- Bard
- Black Mage
- Gameplay Preview